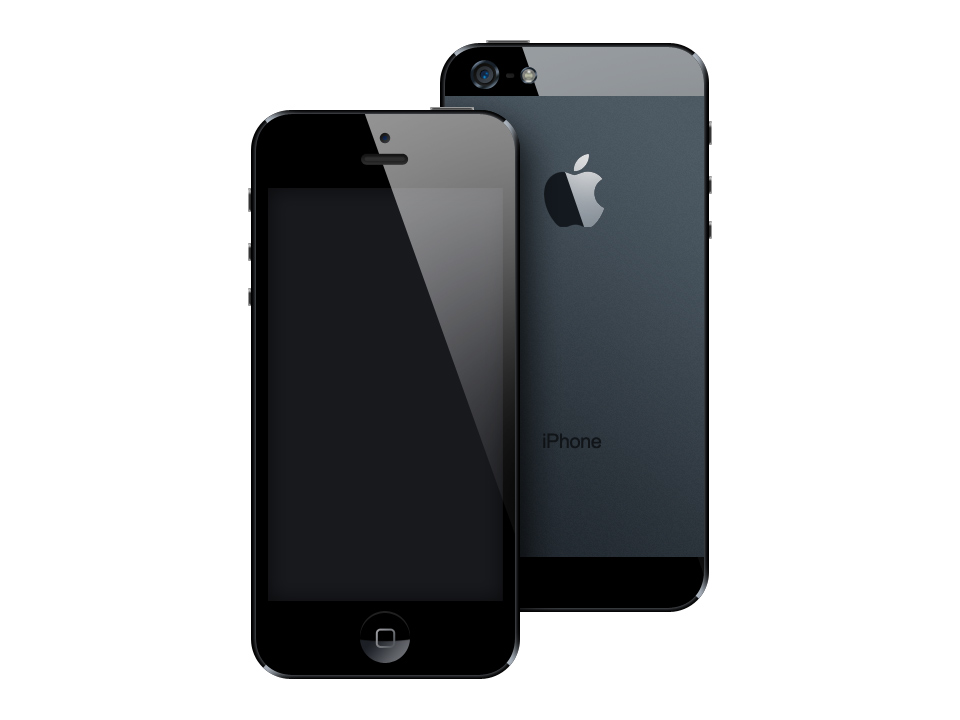
iPhone 5 Photoshop tutorial
Start a new document [CTRL+N] 960x720px.
1. Guidelines
To get the exact proportions we will use guidelines (CTRL+H for hide/show).
Turn on the Ruler Tool (CTRL+R) and move the guidelines from the top and left rulers.
Main frame :
Left ruler: 345 to 610px
Top ruler: 75 to 645px
Draw one more vertical guideline just through the center.
Display:
Left ruler: 360 to 595px
Top ruler: 155 to 565px

2. Metal frame
Pick the Rounded Rectangle Tool, set Radius to 40 px and draw a black shape, name the layer Metal Frame.

3. Black glass
Duplicate layer (CTRL+J) name it Black Screen, change the color to gray and scale it down a little bit. Hide guidelines when you don’t need it (CTRL+H).

4. Metal frame shiny corners
To make the metal frame more realistic let’s add some shiny effects at the corners. Draw a new layer above metal frame layer and make a selection with Polygonal Lasso Tool.
Use soft brush tool #a0a9b4 color, size 45px and paint inside selection.
Deselect selection. Hold CTRL an click on the metal frame layer to make a selection. Then hit right click on the selection and choose Select Inverse. Press Delete button on the keyboard to get rid of the unnecessary brush.
Repeat action for other three corners.

5. Glassy front side
Change the Black Screen layer color to black and add Outer Glow effect with #a0a9b4 color.

6. Screen
Turn ON guidelines, pick Rectangle Tool and draw a rectangle with #18191d color.
Turn off guidelines and add Inner Shadow.

7. Home button
Draw a gray circle, duplicate it CTRL+J, change the color to black and move it down one pixel to get the top border.
Duplicate the black layer and color it to gray, then use the Eraser Tool with 100% hardness, 400px size, and delete top half of the circle (merge down layer to raster to be able to delete it – make a blank layer, select both layers and press CTRL+E).

Add a gradient to it:
#6c6e74
#1c1f25

Draw a rounded rectangle with 4px radius. Add a stoke:
#9b9ba0
#4f5459
Set layer Fill to 0%.
8. Speakerphone and camera
Speakerphone – draw a rounded rectangle with 5px radius and add these gradient values:
#2f2f2f
#151515
Duplicate the shape, scale it down and update gradient color to #2b2b2b and #303030, and add stroke #212121.

Camera – Draw a small circle with gradient:
Angle: 127
#3b3d40
#111111
Duplicate it, scale it down and update gradient color to
#162f52
#0b1c46

9. Side buttons
Make a new layer at the very bottom of all layers and draw a black rectangle. Add Gradient and Inner Shadow effects:
#000000
#919191
#000000
Make three more rectangles, copy and paste layer style from the first one (right click on the layer in layers tab, copy layer style / paste layer style) to other buttons.
10. Glossy effect
Use the Polygonal tool to draw a triangle, fill it with white color, delete unnecessary white color by selecting the Black Screen layer, select inverse and delete it.
Then use the soft Eraser tool, size 800px and delete the bottom part of the glossiness. Set layer opacity to 63%.
11. Back side
Since the front side is finished select all layers and make a group (CRTL+G), name it Front side. Duplicate it and rename the second group to Back side. Hide the Front side folder.
Delete all unnecessary layers that we don’t need at the back side. Select side buttons layers and flip it horizontally – CTRL+T, right click, Flip Horizontal, and move it to the right.

12. Matte rectangle
Draw a rectangle with gradient:
#21282f
#4c5963

Add some noise to it (make a raster layer if needed) – Filter / Noise / Add Noise:
Amount 0.6, Uniform.
13. Camera
Metal frame:
Draw a circle and add a gradient and stroke effects:
Gradient: #272a2c and #0a0805, angle 114.
Stroke: #8b9fb3 and #172028

Lens:
Duplicate layer, delete layer style and scale it down.
Add gradient: #404750, #262a2e
Drop shadow: Opacity 75%, Angle 120%, Distance 1, Size 1
Duplicate layer again, delete layer style and scale it down.
Gradient: #103059, #162641, angle 120%
Stroke: #575c5f, #010101

Duplicate layer again, delete layer style and scale it down and color it to #13243c.
Lastly, use a small brush tool #0b88c9 and add two tiny dots.

14. LED flash
Draw a circle and add a gradient and stroke effects:
Gradient: #7e7e78 and #9a999a, angle 114.
Stroke: #8b9fb3 and #172028
Duplicate layer, delete layer style and scale it down, change the color to #b8baa2.
Pick brush tool and make something similar to this in two separated layers, using a small brush tool with #292c2c gray and #d0d2cf light gray colors.

Move the two layers to the center of circle.
15. Logo
Use text tool and type IPhone with #14191f color and Arial font.
Look at Google for the Apple logo, cut it with Magic Eraser Tool, scale to a proper size, and color it to #14191f.
![]()
16. Glossy effect
Make a new selection with Polygonal Lasso Tool and fill it with white color.

Hold CTRL and click on the apple layer in layers tab to make a selection, CTRL+J to duplicate it, turn off the white triangle layer.
Repeat the last step to get glossy effect at the top of the phone.
17. Done
Unhide Front side folder.